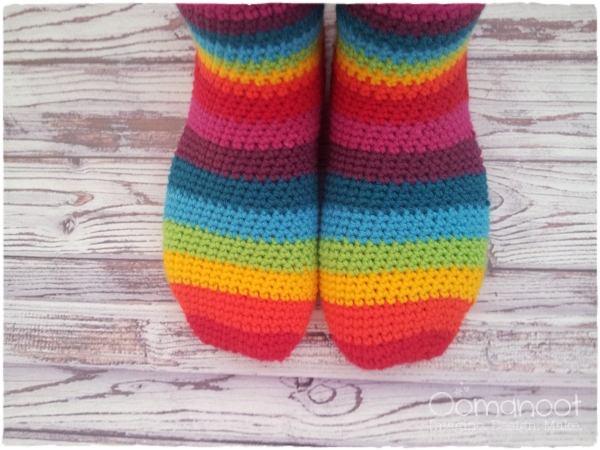
The third and last tutorial in my rainbow giveaway series is my take on a short row crochet slipper sock. Personally, I don’t knit or crochet socks for daily wear (inside shoes), it seems like a lot of work for something no one is going to see and will probably not be as comfortable as a simple store bought socks… So, I make slipper socks for hanging around the house instead.
But first, drum roll please:
And the winners are…
Maayanf gets the yarn.
Lilyrose gets the hat.
Sarit gets the scarf.
Last, but not least – Susan gets the socks.
[If you want to see how the winners were chosen, click here. Sarit got two results from the random number generator, so I chose the next result as the 4th winner. The winners will be contacted by email soon to get their mailing address. If for some reason, they do not respond within a week, their prize will go to the next in the sequence.]
Now, back to the sock making business.Materials
- At least 6 balls of rainbow colors worsted weight yarn. I used 8 balls: red, orange, yellow, green, light blue, turquoise, purple and pink. You’ll have plenty left for other projects.
- 5mm crochet hook
- Blunt needle
- Scissors
Abbreviations
- ch – chain
- st – stitch
- sc – single crochet
- sc2tog – single crochet 2 together: bring up a loop twice, yo, pull through both loops to decrease one stitch.
Notes
- This pattern is worked in the round, do not turn or join unless instructed.
- Colors are changed in the bottom/back of the sock, so they are less visible.
- When changing colors – simply crochet over the left over tails of yarn, it will leave almost no need for weaving in loose ends.
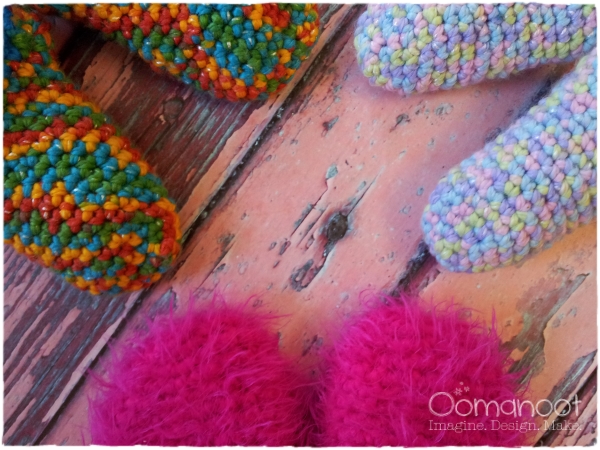
- I use a thicker yarn then you would normally use for socks. The rainbow socks are made with worsted weight yarn, and the other socks in this post are made with super bulky and novelty furry yarn. I also make the toe a bit more round than you would for a fitted sock, I think it looks nicer for slippers, and since they aren’t meant to fit inside anything – the little bit of extra ease around the toes is nice.
- The instructions in this post were written and tested on the rainbow slipper socks, woman European size 39-41, us size 9-10, but rule of thumb instructions are given to adjust for other yarn weights, different fits and other sizes.
Instructions
Shape Toe & Foot
Base chain and round 1: With first color – ch 11. sc in second ch from hook, sc across the base chain (9 sc), turn and sc across the bottom of the base ch. (20 sc at the end of this round)
Place marker in first st to mark the beginning of the round and a different color marker in the 11th st (opposite edge). You will be increasing before and after each marker (4 increases per increase round) to shape the toe. Move the markers up as you go along.
Round 2: [sc (in marked st), 2 sc in next st, sc 7, 2 sc in next st] twice (24)
Round 3: [sc (in marked st), 2 sc in next st, sc 9, 2 sc in next st] twice (28)
Round 4: sc 21, switch color, sc 7 (28)
Round 5: [sc (in marked st), 2 sc in next st, sc 11, 2 sc in next st] twice (32)
Round 6: sc around (32)
Round 7: [sc (in marked st), 2 sc in next st, sc 13, 2 sc in next st] twice (36)
Round 8: sc 27, switch color, sc 9 (36)
Round 9-11: sc around (36)
Round 12: sc 27, switch color, sc 9 (36)
Round 13-32: Repeat rounds 9-12 5 times (36)
Round 33-34: sc around (36)
Round 35: (partial) sc 18
Short Row Heel
Row 1: ch 1, turn, sc 18
Row 2: ch 1, turn, sc 17
Row 3: ch 1, turn, sc 16
Row 4: ch 1, turn, sc 15
Row 5: ch 1, turn, sc 14
Row 6: ch 1, turn, sc 13
Row 7: ch 1, turn, sc 12
Row 8: ch 1, turn, sc 11
Row 9: ch 1, turn, sc 10
You will now have a series of “steps” to shape the heel. Each row, we will “close” those steps to shape the heel. I hope the chart helps clear up what exactly we’re doing here – same colors represent stitches which will be worked together.
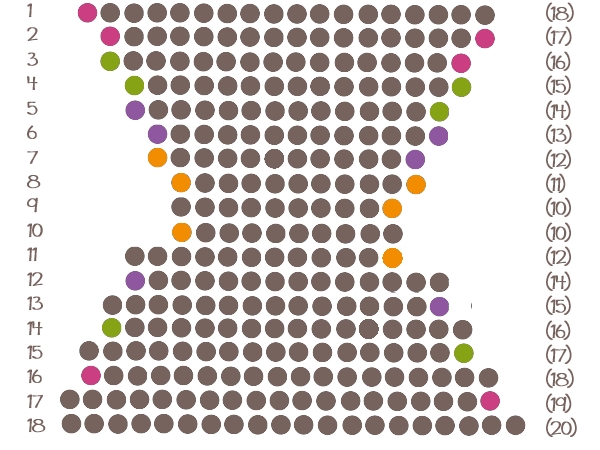
Row 10: ch 1, turn, sc 10, sc in the side of the first step, sc in unworked sc, sl st in side of next step, turn (no ch 1).
Row 11: skip sl st, sc 12, sc in the side of the next step, sc in unworked sc, sl st in side of next step, turn (no ch 1 – same as row 11).
Row 12: skip sl st, sc 14, sc2tog on side and unworked sc: bring a loop up through the side of the next step, bring loop up through next unworked sc, yo and pull through both loops. sl st in side of next step, turn.
Row 13: skip sl st, sc 15, sc2tog on side and unworked sc (same as row 12), sl st in side of next step, turn.
Row 14: skip sl st, sc 16, sc2tog on side and unworked sc, sl st in side of next step, turn.
Row 15: skip sl st, sc 17, sc2tog on side and unworked sc, sl st in side of next step, turn.
Row 16: skip sl st, sc 18, sc2tog on side and unworked sc, sl st in side of next step, turn.
Row 17: skip sl st, sc 19, sc2tog on side and unworked sc, sl st in side of next step, turn.
Row 18: skip sl st, sc 20, sc2tog on side and unworked sc, turn.
Round 19: sc around (38)
Round 20: sc2tog, sc 17, sc2tog, sc 8, change color, sc 9 (36)
Finish Up
Round 21: sc around (36)
Round 22: sc 27, switch color, sc 9 (36)
Round 23-33: repeat rows 21-22
Round 34: sc 27, sl st, bind off
Weave in loose ends.
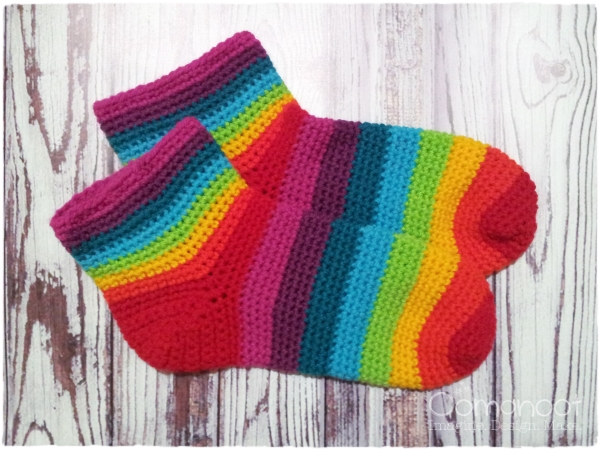
Adjustments for other sizes and fits
- To make different sizes:Start by making a chain from your big toe to your 4th toe. That will be your base chain.Increase for the first two rounds, then alternate – sc around, increase round until you have covered your toes up to the widest part of your foot.Continue sc rounds until you reach your heel, then start the short rows. Decrease until you reach the number of stitches in your base chain – then shape the heel.When you are done shaping the heel, you will be left with more sc then necessary, so you may want to decrease a few.Continue sc around until you reach the desired height, then bind off and weave in as usual.
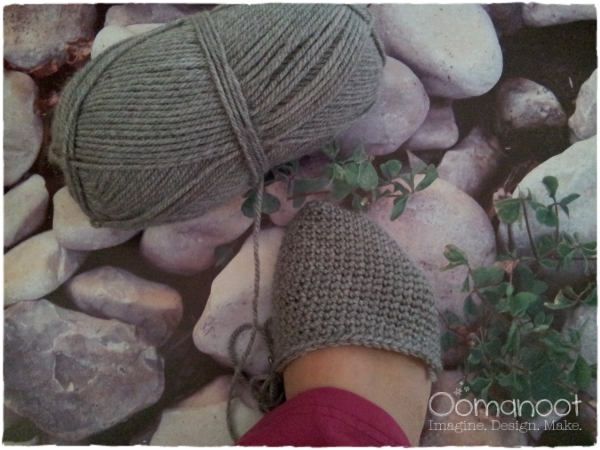
- To make a tighter fitting sock (shown above), make your base chain from your big toe to your 3rd toe, and decrease to 2-4 more st than your base chain.
- To make the same size using super bulky yarn (shown below), start with ch 6, and increase to 20 st. Then, to shape the heel – decrease to 6 st again.
Enjoy!
[This tutorial is free for commercial use. Please read the Terms & Conditions for further details.]





[…] 6. Rainbow Slipper Socks Tutorial […]
[…] 14. Rainbow Slipper Socks by Rina Artstain […]
[…] 16. Rainbow Slipper Socks by Rina Artstain […]
[…] oomanoot […]
[…] Get Free Pattern […]
[…] The summers make you feel a bit cold when its the evening and the there is a chilly air outside so to make yourself warm you really need to cover your feet. And now you can cover your feet in the complete summer feel with these bright rain bow colored socks. SO grab the rain brow yarn colors and bring out your crochet hooks to crochet this adorable pair for yourself and for your girls and friends too. Free pattern with the details given here oomanoot […]
[…] 17. Rainbow socks by Oomanoot Everybody needs socks, and girls love fun socks. Using your extras, you can create some […]
Looks like Round 18 is miswritten. There is no ‘next step’ to slip into here, as you’re SC2TOG with the last row of the top of the foot. Instead, slip into the next unworked stitch from the top of the foot and then turn.
Round 19 should actually be Round 20, and all successive rounds should be effectively moved down.
Instead, Round 19 should read as the corrected Round 18, with the number of SC being 21… so these three rounds would look like this:
Round 18: skip sl st, sc 20, sc2tog on side and unworked sc, sl st in next unworked sc, turn (no ch)
Round 19: skip sl st, sc 21, sc2tog on side and unworked sc, sl st in next unworked sc, turn (no ch)
Round 20: sc around, including stitches you sl st into on the last two rounds (38).
This effectively ‘fixes’ the errors in the pattern that lead the following problems:
1) There is no ‘side’ to slip into on Round 18
2) The lack of a mirror round following Round 18 makes the heel uneven
3) Following the pattern as instructed leaves one crocheting the correct side to the INSIDE of the sock rather than the outside
An alternative to the above method of correction is to eliminate Round 18 altogether, effectively moving all successive rounds up one round number. In doing this, one would treat the final side posts as regular stitches, leaving a 40-stitch ankle rather than the written 38. I have not personally attempted this method, as I thought it might leave too much of a gap at the sides of the heel, but those who struggle with the corrected rounds 18 and 19 may prefer this method.
Keep in mind that this adjustment is from my own experience of following the above written pattern to the letter and removing and redoing several times before finally deciding that there needed to be an adjustment to the pattern in order for the sock to come out correctly. Artists should follow the written pattern as closely as possible to achieve the instructor’s intended results; however, should other artists find that they struggle with this aspect of the heel, they may find my adjustments to be helpful.
Clarification: These comments refer to HEEL ROUNDS, not the first set of rounds in the pattern.
I’m sorry you found the instructions difficult to follow – but they are tested and tested again, and I am sure they are correct and your adjustments are not necessary. Is it possible that you missed a stitch in round 18?
@oomanoot: I tried it and retried it. No missed stitches. It’s just backwards. The stitch count is correct all the way up to the 18th round. There just is no secondary side to slip into and no mirror round afterward to even it up.
The last sl st in row 18 should be worked in the next st, I thought of it as the next step but I guess it can be confusing. That last stitch can also just be skipped, so I removed it from the instructions. However, that is the last short heel row, so there is no need for a mirror round to even it up. You just go back to crocheting in the round after that.
[…] >> Free Crochet Pattern is here […]
Is there a vid to help me with row 10 of the heel?
Hi for the chart from Row 10 … does the yellow Dot on Row 10 get stitched into Row 8 or Row 7?
Does the purple dot of Row 12 get stitched into Row 6 or 5?
I completely understanding the look etc were trying to achieve but Im having trouble colour matching LOL
Regards
Belinda August
When working row 10 you’re not working them together, you’re working them one after the other – first down the side of row 10, then top of row 8, then the side of row 7.
When working row 12 you work the side of row 12 and the top of row 6 together, then the side of row 5.
I hope this clears it up for you… I know it’s a bit tough and I’ve been planning a photo tutorial, it just hasn’t happened yet 🙂
[…] I crochet a pair of low socks for my boyfriend roughly following the instructions from this tutorial (they used 11 chains for the based and I used 7). […]
[…] 14. Rainbow Slipper Socks by Rina Artstain […]
Beginner crocheted here,
I wear a size 8.5 so would I increase the first 2 rounds and ignore the top directions for those two rounds? Then follow round 3 directions above until the last round after that?
thanks so Much . Unfortunally i cant carry on Roc 10 bécasse i dont understand Howard to incréées thé Heel. WorldTour you Hell me. Regards. Noelle
[…] Rainbow Slipper Socks from Oomanoot http://www.rinaarts.com/rainbow-slipper-socks-tutorial-giveaway-3/ […]
I am absolutely not getting the chart… it went fine until I came to step 10.. after that I just cannot understand the instructions.. (Row 10: ch 1, turn, sc 10)
it went fine until: sc in the side of the first step, sc in unworked sc, sl st in side of next step, turn (no ch 1).. hmmm..
Up to row 9 you turned before reaching the end of the row, so you are left with a series of unworked stitches at the end of each row. Starting at row 10, you will be working into those stitches to create the heel. If you look at the chart – those are the stitches which are marked in a different color. I hope this helped a bit (I am planning a photo tutorial, but it’s taking longer than I thought to get around to it).
Thank you for your reply! But I am still lost… 🙁
I want to make this heel!! *bawwwss – I am searching high and low for a tutorial somewhere online to make this heel.. Do you have any links you could share? mostly they are all for knitting..
I did it!!! YAYYYYYY! 🙂 I finally cracked the code 😉 Jubiiiiiii *hops up and down
Great! 🙂
Oh how lovely I would wear them
Im much better at knitting than crochet. I love the bright colours xxxx
Hi!! I am currently working on a pair of these and had a couple questions… at Round 35, should I be turning before doing the first sc 18 ? Otherwise it seems to be putting the heel on the wrong side of the sock.
Also, doing as written, the color changes are going up the foot diagonally (on the underside), is this normal? My heel definitely seems to be crooked compared to the toe line.
Thank you for any help 🙂 I love this pattern and we are doing a CAL to it on IG (hash tag #sockCAL2014 if you’d like to see)
If round 35 puts the heel on the wrong side, just continue the round to the end and then turn, or turn before round 35 (and skip the partial round entirely).
Regarding the color changes – it’s normal for them to be slightly diagonal – it’s just the shift caused by the way crochet round fit into each other (but if it’s really wonky, you might be counting wrong).
I’ll be following your progress, can’t wait to see how it goes 🙂
I had the urge to crochet socks and searched and searched for the right pattern. Can’t tell you how pleased I was to find this. I’ve loved making them,the pattern’s so easy to follow and I’ve got tons more wool lined up to make more! Thanks so much for the pattern especially the heel diagram.
Thanks! That’s really great to hear 🙂 I’m happy the chart is helpful…
I love the looks of these! Am certain to try it. 🙂
Thanks! Good luck 🙂
Awesome! I’ve never crocheted socks before and this looks terrific! Many thanks for posting this! :). 🙂
_______
Lee Ann
Crochet…Gotta Love It! Blog
YouTube Channel
#crochetgottaloveit
#crochet
That’s great to hear! Good luck 🙂
These are so adorable! I am just starting to crochet, like I’ve done two projects 🙂 but these are on my list to try.
Good luck! If you have any questions, don’t hesitate to ask 🙂
My socks arrived! They are fantastic! Thank you!
I’m so happy to hear! Wear them well 🙂
I Win! Thanks!!
Enjoy 🙂 don’t forget to share pictures of what you make…
Yeah got the hat!!! How cool is that!!
enjoy 🙂