Do I really need to explain why I wanted to crochet a duck? They’re so cute, and my daughter loves them. I knew that she would love it, and I was right! She absolutely insisted to take it to day care and won’t let it go long enough for me to get a good picture. See?
This pattern took a little “figuring out”, because I wasn’t sure how I was going to get the curvy tail shape, and I really wanted to make it one continuous piece instead of making separate body and head pieces and sewing them together. Well, here goes:
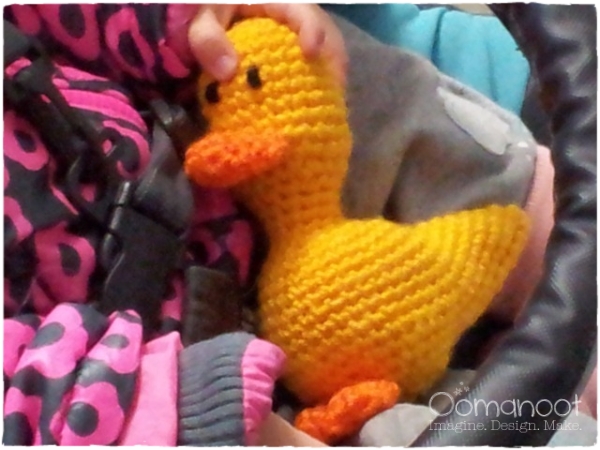
Materials
- 1 ball worsted weight yellow yarn.
- A small amount of orange yarn for the beak and feet and a tiny amount of black yarn for the eyes.
- Fiberfill stuffing.
- 4-4.5mm crochet hook
Notes
- Gauge is not critical for this project, just make sure that your stitches are tight enough that the fill does not show through.
- The duck is crocheted from the head, top down, in continuous rounds. Do not join or turn unless specifically instructed.
- Place a marker in the last stitch of every round. Move it up as you work.
Abbreviations
- ch – chain
- sc – single crochet
- st – stitch
- idec – invisible decrease. Instructions for this can be found here.
- [ … ] – repeat instructions in [ ] as many times as specified.
Instructions
Head
1: With yellow yarn, ch 2. 6 sc in second st from the hook, or use the magic loop method.
2: Work 2 sc in each sc around – 12 sc at the end of this round (12)
3: [2 sc in next sc, sc in next sc] 6 times (18)
4: [2 sc in next sc, sc in next 2 sc] 6 times (24)
5-13: sc in each sc around (24).
14: [idec, sc in next 2 sc] 6 times (18)
15: [idec, sc in next 1 sc] 6 times (12)
Stuff head firmly.
16-18: sc in each sc around (12). This forms a short neck.
Body
19: [2 sc in next sc, sc in next sc] 6 times (18)
20: [2 sc in next sc, sc in next 2 sc] 6 times (24)
21: [2 sc in next sc, sc in next 3 sc] 6 times (30)
For the next few rounds what we’re doing is sc around the front of the duck (we’ll even out the number of stitches in the next two rounds), and shaping the duck’s back by increasing in the middle of it’s back.
22: sc in next 21 sc, 2 sc in next 3 sc, sc in next 6 sc (33)
23: sc in next 7 sc, 2 sc in next sc, sc in next 14 sc, 2 sc in next 4 sc, sc in next 7 sc (38)
24: sc in next 25 sc, 2 sc in next 4 sc, sc in next 9 sc (42)
25: sc in next 28 sc, 2 sc in next 2 sc, sc in next 12 sc (44)
26: sc in next 29 sc, 2 sc in next 2 sc, sc in next 13 sc (46)
27: sc in next 30 sc, 2 sc in next 2 sc, sc in next 14 sc (48)
Next, we’ll start shaping the duck’s belly.
28: [idec, sc in next 2 sc] 4 times, sc in next 32 sc (44)
29: [idec, sc in next sc] 4 times, sc in next 32 sc (40)
Now, we will join the middle of the right and left side of the duck to close it’s bottom.
30: sc in next 14 sc. Close a circle by sc in the 6th stitch from the end, sc in next 5 st (20).
31: idec around (10)
32: idec around (5)
Cut thread leaving a long tail, pull through last stitch and sew the hole closed. Finish stuffing the body, and use the long tail to sew the rest of the body closed.
Beak
1: With orange yarn, ch 2. 6 sc in second st from the hook, or use the magic loop method.
2: Work 2 sc in each sc around – 12 sc at the end of this round (12)
3-4: sc in each sc around (12)
Cut yarn, leaving a long tail, and pull through last stitch.
Feet (make 2)
1: With orange yarn, ch 5. sc in second ch from hook, sc in next 2 ch. 3 sc in next ch. Continue on other side of the foundation chain. sc in next 2 ch, 2 sc in next ch (10)
2: Fold in half around foundation chain to form a foot. Continue sc around for 1 more round (10)
3: [sc in next 3 ch, idec] twice (8)
Cut yarn, leaving a long tail, and pull through last stitch.
Attach beak to head and embroider eyes using black yarn.
Attach feet to body.
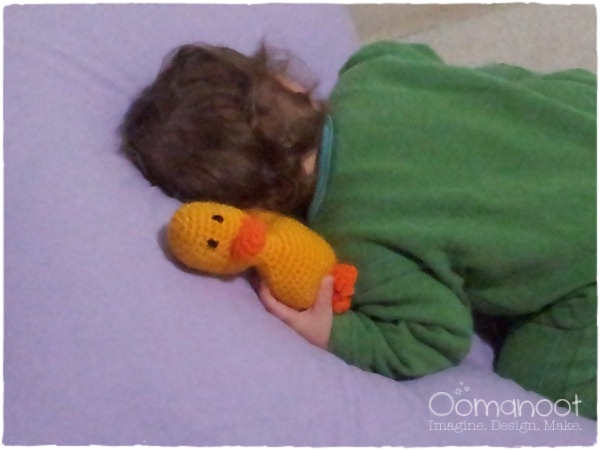
Enjoy!
[This pattern is for personal use only. Items made with this pattern may not be sold without my explicit permission. Please read the Terms & Conditions for further details.]





What a excellent post! I spend a few moments on reading, and I am so excited by the information that I received, by
the manner of writing it reminded me https://www.onlinetutorforme.com/social-studies-tutors/. It is actually tough to
locate something invaluable. But this author appears to
be considered a professional since there’s really just a exceptional personality in his writings.
I’m going to contribute to his newest publications, just not to skip
any such thing. This post worths its reading.
Sorry to be a pest but I have two more questions:
Do you fold beak in half to sew on?
After folding the foot in half at row 2, do you single crochet all the way around the perimeter or just where you need to stitch to hold the halves together?
Not sure if you saw the two additional questions I left for you yesterday in the comments
1. Yes, fold the beak in half (squish it flat).
2. Yes, I single crochet all around the perimeter.
Good luck 🙂 Send me pictures when you’re done 🙂
I can’t figure out row 30, close a circle by…… Help!!!! I need this for Easter!! Thanks
The idea here is to skip a few stitches in this round. What I did here was to leave a small gap at the base of the tail (which sewn shut later) while still finishing the base of the body continuously. So basically, you’re forming a circle between the 14th stitch and the last few stitches.
I hope this explanation clarifies it a bit 🙂
Ohhh I am so excited about finding the duck… I made a duckling and so wanted to find a mama for it (soon to be them:). Thank you so much. Could you please tell me what row you put the eyes and the beak? TYSM for sharing your wonderful pattern I am new to Amigrurumi and to get free pattern for those so us on limited income but plenty of time is such a blessing.
I think I figured it out…
Great! 🙂 🙂 🙂
What does it mean to sc in 6th stitch from the end, in round 30? Am I to skip 4 st in between? Thanks! I’m almost done!!
Loved this pattern! Adorable and I found it really easy to follow.
Thank you for posting!
Thanks! That’s great to hear. Feel free to share pictures 🙂
Ok I will try it. I was getting confused on the close the circle and then doing the decrease to 20’s and stuff
I love this pattern! I just emailed you actually but I figured out I could comment. Anyway I am new to this and I was just stuck on the closing the circle part when you finish up the bottom. Can you help walk me through what I am suppose to do because I am not good enough to understand the instructions on that part ;P
Thanks so much! That’s really great to hear.
Anyway, to close up the hole – thread your yarn tail into a blunt large eyed needle. Pull the yarn through a stitch and then across to another stitch (not an adjacent one). Repeat 3-4 times with non adjacent stitches, and you will close the gap. Pull the yarn into the body of the duck and out the other side. Pull the yarn tight and cut. When you let go, the edge will disappear inside the body.
(If you use adjacent stitches, you will get a “bump” from the top of the stitches. When you cross over the hole, you get a nice flat finish)
I hope this was helpful 🙂
Thank you for posting the picture on facebook! I’ve already used your invisible decrease method on another project and it works so well. Thanks again for sharing your ideas.
🙂 🙂 🙂
I just finished making this cute little guy. I put a washable rattle in him. Thank you so much for posting the directions. The invisible decrease is a great technique, too!
I love to hear that my patterns are put to good use. I’d love to see the result – you can post it to my Facebook page or share a link right here 🙂 Thanks!
Well, it's crochet not knit 🙂 And I am willing to teach. I'm thinking of organizing a group session, do you think you'd be interested in joining? (I think we already talked about this idea…)
you allways making me miss knitting. but i sucked 🙂