
I don’t know about you, but everytime I see a beautiful wood play kitchen for kids I think: “Wow! That’s incredible!” And right after that: “But where will I put one of those?”
So, if you’re like me and have already told all your friends and relatives you have run out of room for toys and only bring gifts if they are two dimensional please, this tutorial is for you: A play kitchen in a box. The fabric covered box is the stove and oven, and all the accessories are kept inside. Cook, play and put it away! And – when it gets a bit dusty and musty, take the fabric cover off and wash it! What could be better…

Materials
- Medium sized plastic box with a lid.
- Enough fabric to line the box and cover the lid and the sides. I used two different fabrics for the lining and the exterior, but you don’t have to.
- 4 grey felt circles approx 5” in diameter + 8 black felt strips 1” wide by 4” long.
- Optional: two small Velcro pieces, a strip of felt and more fabric to create an oven door.
- 4 large buttons or a set of 4 kitchen cabinet round handles.
- If you’re using a set of kitchen handles, you’ll also need a hot glue gun.
- Fabric marker
- Standard sewing notions
Instructions
-
Measure & Cut: Measure the height, width & depth of the plastic box and lid, mark and cut fabric pieces accordingly (see image).

-
Assemble box cover: Pin main fabric panels to matching sides of the lining, right sides facing. Sew with a 1/2″ seam allowance. Open and press seam flat (see image).

-
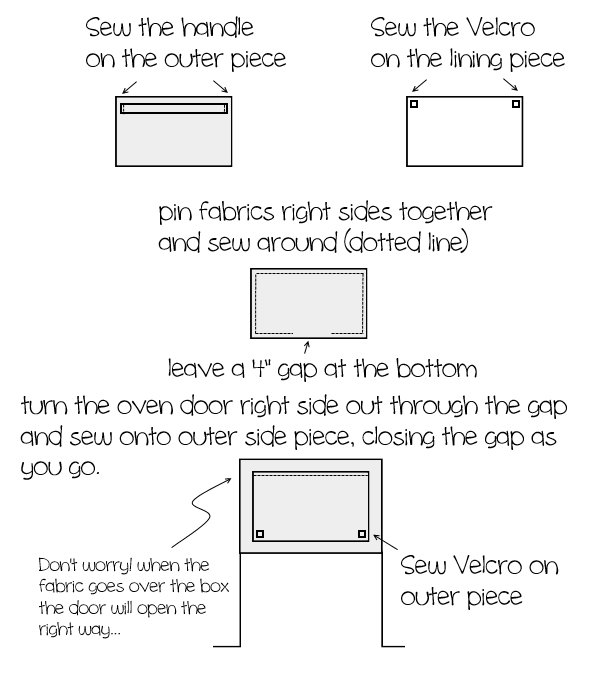
Optional – assemble oven door: Sew two small Velcro squares to the top two corners of the oven door lining fabric piece. Sew the felt strip to the oven door main fabric piece (just a few stitches on each side, to make a handle).
Pin both fabric pieces together, right sides facing. Make sure both the Velcro and the handle are at the top… Sew around all 4 sides leaving a 4″ gap at the bottom. Turn the oven door right side out through the gap and press flat.Center the door on the side fabric panel, and pin in place. Edge stitch across the bottom of the door, closing the gap as you go. Note that it will seem upside down – but once the fabric is placed in/around the box, it will be facing the right way. Don’t worry…
Sew the other half of the Velcro onto the fabric panel so that they match the ones on the door. (I made an outline for the oven, but I’m not so happy with the result, so I recommend skipping that part.)
-
Construct the box lining and exterior: Fold the fabric diagonally, right sides facing and sew sides together. Repeat for the second diagonal.

Fold down the open edge 1/2″ to the wrong side of the fabric. Fold over another 1/2″ all around and sew to create a neat hemmed finish.
Place lining inside the box (still wrong side out) and fold the main fabric over the box exterior. Your box is now covered.
-
Assemble the stove top: Sew the black felt strips on to the grey felt circles in the shape of a + sign. Arrange felt circles and buttons/handles on the stove top. When you are happy with the arrangement, mark the locations.
Sew felt circles in place. If you are using buttons – sew them in. If you are using handles – make button holes where you’d like the handles to be.Fold the stove top fabric diagonally, right sides facing, and sew sides together. Repeat for the second diagonal.
Fold down the open edge 1/2″ to the wrong side of the fabric. Fold over another 1/2″ all around and sew to create a neat hemmed finish.
Turn stove right side out and fit onto the top of the lid. It should be a bit tight so it doesn’t move or fall off.
If you’re using a handle set, use a pen to mark the location of the button holes. Take the fabric off the lid, then hot glue the handles to the top of the lid. Wait until they are firmly stuck, and then re-cover the lid, sliding the handles through the button holes.

Fill the box & enjoy!
My daughter likes to bake “cookies” and make Perler Bead soup (which can be quite messy if the pot overflows…). Then she sets up these great picnic parties on a blanket in the living room. I wish my dinner parties were that nice. And when we’re done – everything goes back in the box and away in the cupboard. Yey!


[This tutorial is free for commercial use. Please read the Terms & Conditions for further details.]







[…] Check Here […]
[…] Click Here […]
[…] Пълни инструкции как да я направите вижте тук Пълни инструкции как да я направите вижте тук […]
[…] This one is the unique and totally amazing idea to make a play kitchen out a box in which the kids can put all their kitchen stuff after playing in that fabric wrapped box. So do make it and give your kids a sheer delight to play with and have a immense fun oomanoot […]
Hey
I want to say what a nice website you have made.
I am a regular customer of your store.
I had visited your store last month, and I saw a very nice item i wanne buy.
But I have a question! today I wanted to order it, but can not find the item anymore in your webshop.
The product looks like the first picture on this website. http://bit.ly/PictureSewingItem563
Mail me if you are going to sell it again.
I’ll wait.
Sincerely
[…] Oomanoot […]
[…] Oomanoot […]
[…] 15. Link – KLIK […]
[…] 7. Play kitchen just in a box: Oh my god! This one is my favorite. If you have space problem in your apartment and yet you want to gift your toddler a play kitchen this is the right pick for you. Just buy a plastic box and cover it up with enough fabric. Use marker pen for detailing. You will need sewing needle to sew it. […]
Really love this idea but does the oven door open into the box? Did you cut a hole in the box for that? I’m confused on this part but otherwise it’s awesome!
[…] 15. Or try this play kitchen in a box version, complete with fabric template, from Oomanoot: […]
[…] Rina at Oomanoot made a clever little Kitchen-in-a-Box with a fabric cover that is perfect for small space living. Gift it to your nephew or niece in the […]
[…] don’t require much yarn, so you can make a few in your favorite flavors. They can be used in a play kitchen, or string a few together as a summer party decoration. Or you could let your kids leave them lying […]
[…] Play Kitchen in a Box Click for Tutorial […]
So cute!! 🙂
Thanks 🙂
[…] Rina from Oomanoot shows how to make a child’s Play Kitchen-in-a-Box that won’t take up too much space in your house or cost you a ton of money to buy. The pretend stove and oven is made from a fabric cover fitted over a plastic box. The materials are inexpensive – just fabric, a plastic box, and some wooden knobs. Dishes and play food can be stored inside the box when the kitchen is not in use. Brilliant! Go to Oomanoot to get the tutorial. […]
Beautiful post! (as always)
I love those toys; play for 10 hours (I wish I could too), clean up in 10 seconds.
Thanks!
I couldn’t agree more 🙂