
My daughter is quite a girly-girl. And while I will raise her to be strong and independent, I’m thoroughly enjoying her girly-ness. A couple of days ago she came home from day care upset because her plastic headband had broke. In an effort to cheer her up I asked if she would like me to make her a new one.
That didn’t work.
So I asked her if she’d like to help me choose the fabric.
She chose three.
Then she was happy.

Then she went somewhere else to play, and I sat down to sew.
Materials
These measurements match my 3 year old who’s head measures 20 inches. To adjust the size, measure (or estimate…) the circumference of the recipient’s head (around the hair line, behind the ears and to the back of the neck). We’ll call that measurement X.
- Scrap fabric, less than a 1/4 yard or a few long strips at least 3″ wide.
- 4″ of 1/2″ wide elastic.
- Matching thread
- Regular sewing notions.
Instructions
-
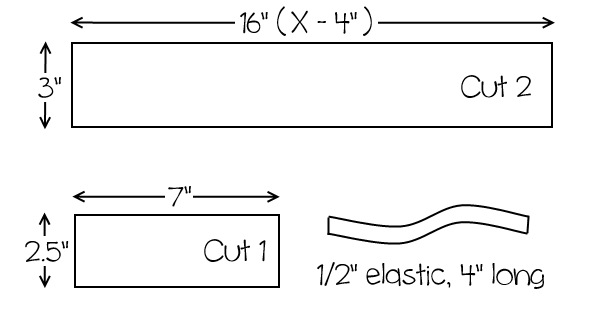
Prepare materials: Cut two rectangles 16″ by 3″ (or, for a different size: X – 4″ by 3″). Cut 1 rectangle 7″ by 2.5″. Cut 4″ from your elastic.
-
Sew main piece: Fold over the short ends of the longer rectangles 1/2″ to the wrong side of the fabric and press. Pin the two long pieces together right sides facing. Sew together on both sides, 1/2″ from the edge.
Measure and mark 1″ from each corner on the both the short and long edges. Sew diagonally from mark to mark to create the corners. Cut excess fabric 1/4″ from the seam.

-
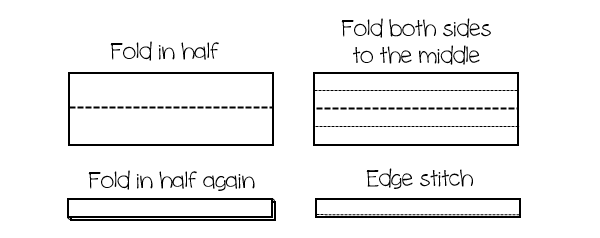
Make elastic casing: Fold the smaller rectangle in half lengthwise and press. Open and fold both sides lengthwise to the center fold and press. Fold in half again. Pin closed and edge stitch across the open edge.
Push elastic inside the casing using a safety pin attached to the end. When the tail end is just about to be pulled in to the casing, pin it in place so that a tiny bit is still sticking out. Pull the elastic through to the other end and pin in place (also with a tiny bit sticking out).
Sew ends shut to secure the elastic.
-
Finish up: Insert the elastic casing (with the elastic securely inside) into the 1″ gap in the bottom of the main piece and pin in place. Repeat for the other end, making sure that the elastic casing is not twisted. Edge stitch around. Sew over the elastic casing again to make sure it’s secured, as the tension tends to pull the ends out.

Enjoy!
[This tutorial is free for commercial use. Please read the Terms & Conditions for further details.]











[…] Rina from Oomanoot shows how you can make a pretty headband out of your fabric scraps. A bit of elastic at the bottom will help them fit snug. They’re quick and easy to sew up. They’re cute left plain, but you could also have fun adding embellishments. Go to Oomanoot for the tute. […]